
Going to the Studio in the OnAIR portal
At some point before the event at which you are going to make a presentation begins, you received (or will receive) an email confirming your registration for the event and giving you some essential information. Included in the email are two clickable web links that allow you to access and log into the OnAIR portal for the event.
One link provides "automatic" access and login; that is, a click on this link will direct your internet browser to the OnAIR event website and will automatically log you into the portal. You will not need to enter a user name or a password, since that information is included in the link.
The other link (which starts with something like https://portalapp.mines.eventsair...) is provided in case you want to use a browser that is not your "default" browser, or if for some reason you do not want to use the automatic link. If you click this link, you will be taken in your default browser to the OnAIR portal where you will be required to provide your access credentials. The credentials are included in the email. If you want to use a browser other than your default one, you can copy the entire link and paste it into the address box of any modern browser. This approach will also take you to the OnAIR portal where you will need to provide your access credentials to continue.
Quick Tip
Immediately after you have successfully logged in to the OnAIR portal, you'll see that OnAIR is checking your camera and microphone as well as the quality of your internet connection. It's impossible to describe here the exact wording that may appear because every person's audio and video equipment and arrangement is different, but you should use your best judgement about how to respond to any information, prompts, or buttons that appear for you. In particular, note the result of the Live Video Call Check (the test of the quality of your internet connection). If the result indicates that your connection is poor, your should make every effort to improve the connection.
Quick Tip
After the completion of the audio, video, and internet tests, you will be presented with a form that requests certain information for your profile — not all of which is required. You should ensure that your name is as you want it to be, but the other personal information is completely optional. However, you must ensure that you have scrolled down to the bottom of the dialog to the portion that allows you to set your camera and microphone. When you have completed the profile, click/tap the Update and Close button. This form will be presented to you only the first time you log into the portal.
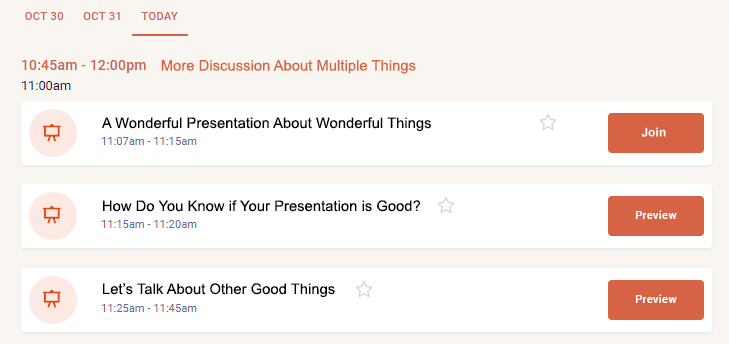
When you enter the OnAIR portal for the event, you will arrive on the event Timeline. A portion of an example Timeline is shown below.
Using the Timeline
On the Timeline, you will see dates (such as Oct 30, Oct 31, and Today in the example above) that correspond to the days/dates of the event. Click/tap the date that represents the day of your presentation. The Timeline content will now show the event sessions scheduled for that day. Look for the session during which you will make your presentation. You may need to scroll down the list. If the button on the session listing shows Preview or Join, you will be able to enter the Studio.
Quick Tip
OnAIR allows a participant to have multiple roles during the event. For example, on Day 2 of the event in a 10 o'clock session, you may be making a presentation; thus, for that session on that day, you are performing the role of presenter. But if on all other days in all other sessions, you are just a member of the audience, you will be performing that role instead. In other words, if you join a session for which you are an audience member, you will be placed in the audience. If you join a session for which you are a presenter, you will be taken into the Studio. You don't need to worry about which roles you have for which sessions; all of that is set up for you before the event.
Next, let's get you INTO the Studio!
Click/tap the Next button to go to the next page; use the Back button to go back.