
PowerPoint setup actions sequence diagram details
This page provides detailed information about some of the action blocks shown on the PowerPoint setup actions sequence diagram.
Configure PowerPoint and Studio Windows So Both Are Visible
Since you will be adjusting the size and position of both the PowerPoint window and the Studio window, you should configure them now so that both are visible. It would be best if neither window overlaps the other. This step is more important for "2-screen" presenters than for those with only one screen, since "1-screen" presenters will be adjusting the windows further in later steps.
!➜ The three steps listed below apply ONLY to "1-screen" presenters.
Adjust PowerPoint and Studio Windows
If the windows were adjusted in the earlier configuration step so that both windows are fully visible, there is nothing further to be done in this step. Otherwise, a good arrangement for now would be to have the PowerPoint window a bit wider than half the width of the screen, and the Studio window either overlapped by the PowerPoint window or off to one side.
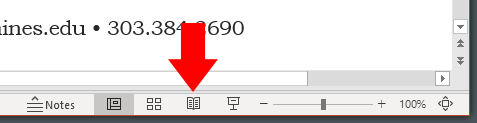
Start Reading View in PowerPoint
To start Reading View, look at the bottom right corner of the PowerPoint window. Among the row of small icons you will find in that location is one that looks like the pages of an open book. (See the illustration below.) Click/tap that icon, and PowerPoint will change to Reading View.
When you enter Reading View in PowerPoint, the size and position of the PowerPoint window do not change; however, the content of the window does. The parts of the PowerPoint window that allow you to create and edit slides and arrange the slide deck, and that provide all of the PowerPoint settings and actions will disappear, leaving only the slide that was previously shown in PowerPoint. The slide is arranged to fill the window from side to side and centered top to bottom. Because the height-to-width ratio of the slide will most likely not match the ratio of the window, some black areas may appear above and below your slide. In the next step, you will make those black areas go away if they appear.
Adjust PowerPoint Window to Remove Black Areas
The video below shows what you need to accomplish in this step. (You may need to click or tap the video window to start playback.) As shown in the video, your objective is to remove any black areas that may surround your slides in the PowerPoint Reading View window. To do so, you must adjust the size of the PowerPoint window.
Quick Tip
Although the video shows dragging the right side border of the PowerPoint window to resize it, you can drag any of the four borders or any of the four corners of the window in order to accomplish the dual goals of removing the black areas AND making the PowerPoint window a size that allows you to see both PowerPoint and the Studio on your screen.
Try not to be over-zealous in eliminating the black areas. If you continue resizing the window after the black areas have disappeared, you will be trimming off parts of your slides — parts that the audience will not see.
Quick Tip
As long as your resized and black-area-free PowerPoint window is at least as wide as about half the width of your computer screen, the size, clarity, and detail of the image sent out to the audience is not improved by making the window bigger. Your goal is to make the PowerPoint and Studio windows as large as you can while still being able to see — on your computer — enough of both windows comfortably so you can know what's going on in the Studio and so you can successfully give your presentation.
Quick Tip
Please be aware that the top and bottom "ribbons" of the PowerPoint window (the white areas above and below your slide) will be visible to the audience. Since the top ribbon shows the name of your PowerPoint file, you may want to be cautious about how you name the file!
!➜ The information below applies ONLY to "2-screen" presenters.
Configure and Start Slide Show in PowerPoint
The following discussion assumes that you want to use your available monitors so that your presentation slides are "full screen" on one monitor while the Studio remains visible on another monitor. To set up this configuration, you must visit some settings in PowerPoint.
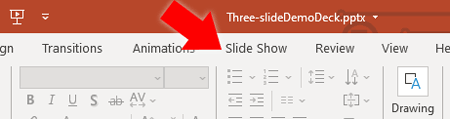
To begin, click/tap the words Slide Show that appear at the top of the PowerPoint ribbon (you may need to increase the width of the PowerPoint window to make the words appear).
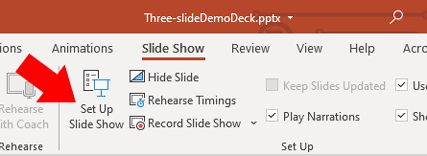
The content of the ribbon will change and will display the slide show options. Click/tap Set Up Slide Show.
A dialog, shown in the illustration below, will appear. Refer to the numbered tokens that have been placed on the illustration for the following discussion.
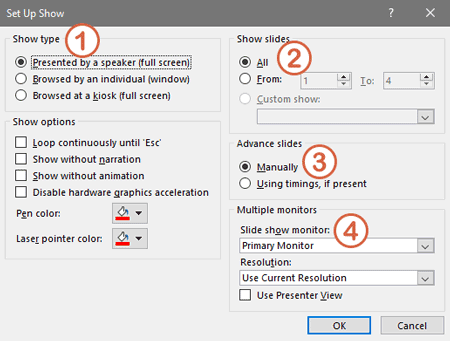
1 Show type
Ensure that Show type is set to Presented by a speaker (full screen).
2 Show slides
Ensure that Show slides is set to All.
3 Advance slides
Unless you want the slides in your presentation to advance automatically with timings that you set when you created your presentation, you should ensure that Advance slides is set to Manually.
4 Slide show monitor
This drop-down selector determines the monitor on which your slides will appear in full-screen mode. Use your best knowledge to select a monitor that is not displaying the Studio. Your selection will be tested later in the setup process. If it was incorrect, you can return to this dialog to select a different monitor.
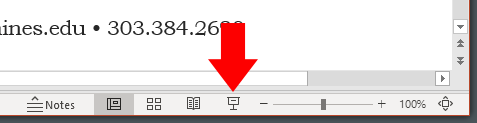
Start your slide show
To start your slide show, look at the bottom right corner of the PowerPoint window. Among the row of small icons you will find in that location is one that looks like a stand-up movie screen. (See the illustration below.) Click/tap that icon, and PowerPoint will start the slide show.
Quick Tip
If your slides appear on the wrong monitor (they cover the Studio window), stop the slide show (click the slide and press Escape on your keyboard) and repeat the slide show setup steps presented above — but this time, select a different monitor.
Quick Tip
After you have determined that you have properly configured PowerPoint and your monitors, be sure to leave everything just "as is" — except do go back to the first slide of your presentation if you have advanced past it during setup. Do not exit full screen mode.
Using PowerPoint's Presenter View
If you plan to use PowerPoint's Presenter View while delivering your presentation, please inform the practice session leader during your practice session so an opportunity for you to use that method can be provided during the session.